🟠. 안전모 데이터셋을 가지고 안전모 탐지하기
- 데이터셋
◼ ultralytics 설치
|
! pip install ultralytics
|
◼ import
|
import os
import random
import shutil
import yaml
import cv2
import glob
import ultralytics
import matplotlib.pyplot as plt
import xml.etree.ElementTree as ET
from ultralytics import YOLO
from torchvision import transforms
from tqdm import tqdm
|
◼ ultralytics 버전확인
|
ultralytics.checks()
|
 |
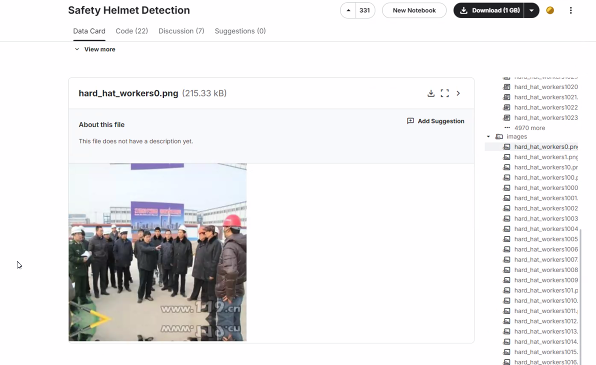
◼ Kaggle 데이터셋 API로 다운받기
|
! kaggle datasets download -d andrewmvd/hard-hat-detection
|
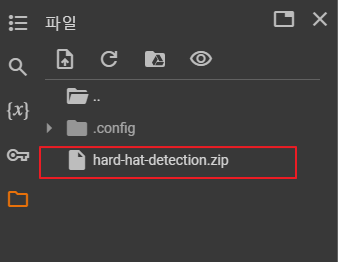 |
◼ 압축풀기
|
! unzip -q /content/hard-hat-detection.zip
|
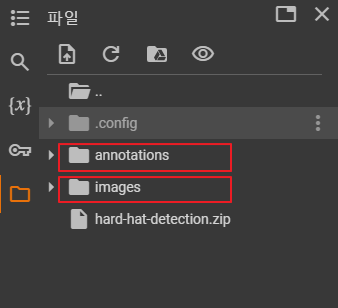 |
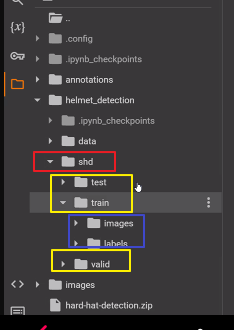
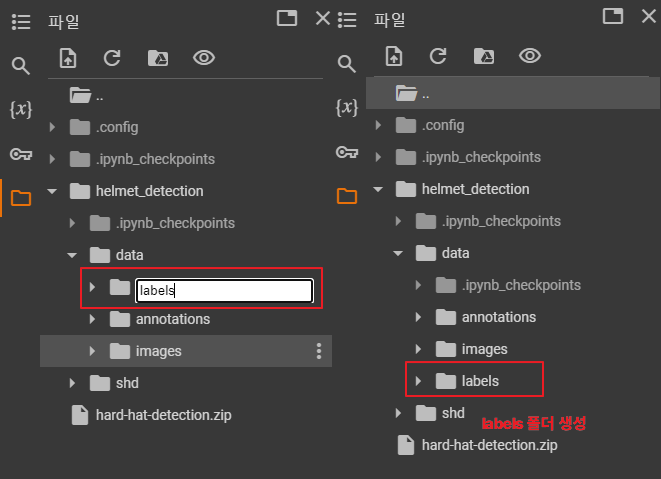
✔ 폴더 생성 | 데이터 옮기기
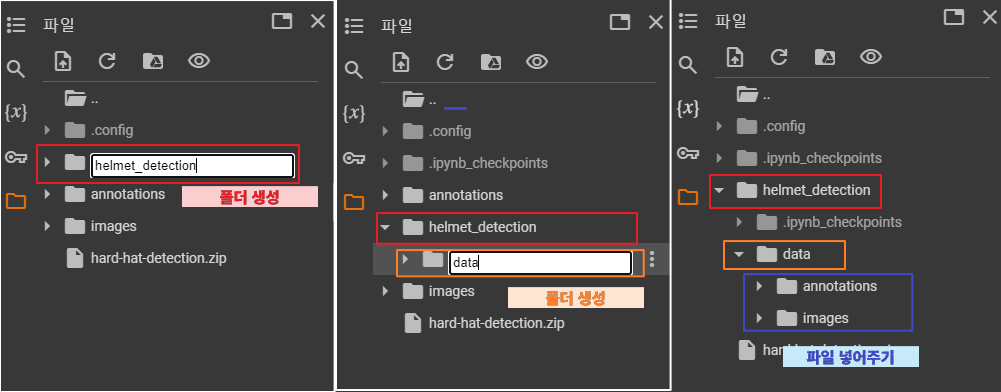 |
◼ 폴더 정리
|
# helmet_detection 디렉토리를 생성
data_root = '/content/helmet_detection'
# helmet_detection/data 디렉토리를 생성
file_root = f'{data_root}/data'
project_name = 'shd' # safty helmet_detection
train_root = f'{data_root}/{project_name}/train'
valid_root = f'{data_root}/{project_name}/valid'
test_root = f'{data_root}/{project_name}/test'
for folder in [train_root, valid_root, test_root]:
if not os.path.exists(folder):
os.makedirs(folder, exist_ok=True)
for s in ['images', 'labels']:
s_folder = f'{folder}/{s}'
if not os.path.exists(s_folder):
os.makedirs(s_folder)
|
 |
◼ [ images ] 폴더에 있는 모든 .png 파일의 개수
|
# helmet_decteciton/data 디렉토리에 imgaes. annotations를 넣어줌
file_list = glob.glob(f'{file_root}/images/*.png')
len(file_list)
|
| 5000 |
✔ 폴더 생성
 |
✔ 바운딩박스 좌표를 YOLO 형식으로 변경할 필요성
 |
◼ 함수 정의
|
def xml_to_yolo_bbox(bbox, w, h):
# xmin, ymin, xmax, ymax
x_center = ((bbox[2] + bbox[0]) / 2) / w
y_center = ((bbox[3] + bbox[1]) / 2) / h
width = (bbox[2] - bbox[0]) / w
height = (bbox[3] - bbox[1]) / h
return [x_center, y_center, width, height]
|
- 주석
더보기
|
def xml_to_yolo_bbox(bbox, w, h):
# bbox: [xmin, ymin, xmax, ymax]
# w: 이미지의 너비
# h: 이미지의 높이
# 중심 x 좌표 계산
x_center = ((bbox[2] + bbox[0]) / 2) / w
# 중심 y 좌표 계산
y_center = ((bbox[3] + bbox[1]) / 2) / h
# 너비 계산
width = (bbox[2] - bbox[0]) / w
# 높이 계산
height = (bbox[3] - bbox[1]) / h
# YOLO 형식 [x_center, y_center, width, height] 반환
return [x_center, y_center, width, height]
|
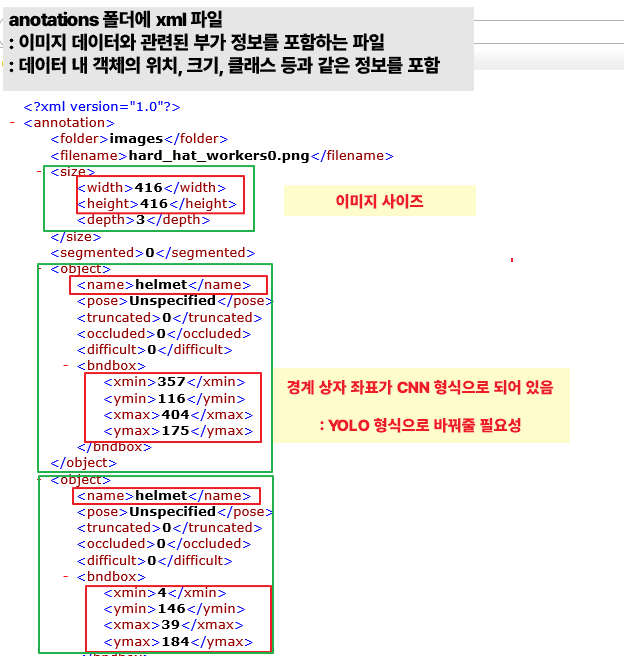
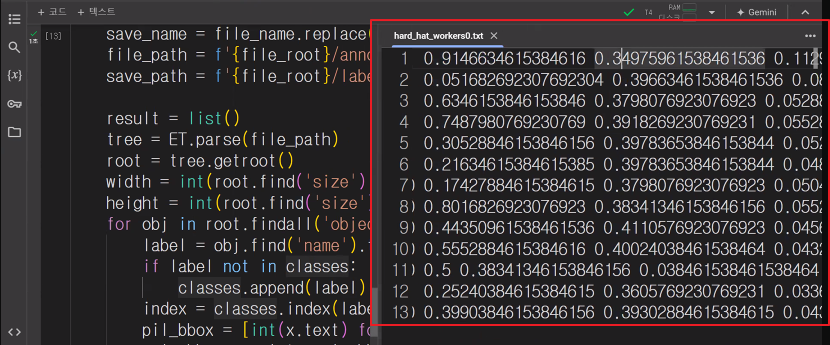
◼ 각 이미지에 대한 객체 탐지 정보를 Pascal VOC 형식에서 YOLO 형식으로 변환한 후,
해당 정보를 텍스트 파일로 저장
|
# /content/helmet_detection/data/labels 디렉토리 생성
classes = []
for file in tqdm(file_list):
file_name = file.split('/')[-1].replace('png', 'xml')
save_name = file_name.replace('xml', 'txt')
file_path = f'{file_root}/annotations/{file_name}'
save_path = f'{file_root}/labels/{save_name}'
result = list()
tree = ET.parse(file_path)
root = tree.getroot()
width = int(root.find('size').find('width').text)
height = int(root.find('size').find('height').text)
for obj in root.findall('object'):
label = obj.find('name').text
if label not in classes:
classes.append(label)
index = classes.index(label)
pil_bbox = [int(x.text) for x in obj.find('bndbox')]
yolo_bbox = xml_to_yolo_bbox(pil_bbox, width, height)
bbox_string = ' '.join([str(x) for x in yolo_bbox])
result.append(f'{index} {bbox_string}')
if result:
with open(save_path, 'w', encoding='utf-8') as f:
f.write('\n'.join(result))
|
  |
◼ 클래스 레이블 확인
|
classes
|
| ['head', 'helmet', 'person'] |
◼ cls_list에 넣어주기
|
cls_list = ['head','helmet','person']
|
◼ 랜덤시드 고정
|
random.seed(2024)
|
◼ 파일 목록을 섞고, 이를 학습, 검증, 테스트 데이터셋으로 나누기
|
random.shuffle(file_list)
test_ratio = 0.1
num_file = len(file_list)
test_list = file_list[:int(num_file*test_ratio)]
valid_list = file_list[int(num_file*test_ratio):int(num_file*test_ratio)*2]
train_list = file_list[int(num_file*test_ratio)*2:]
|
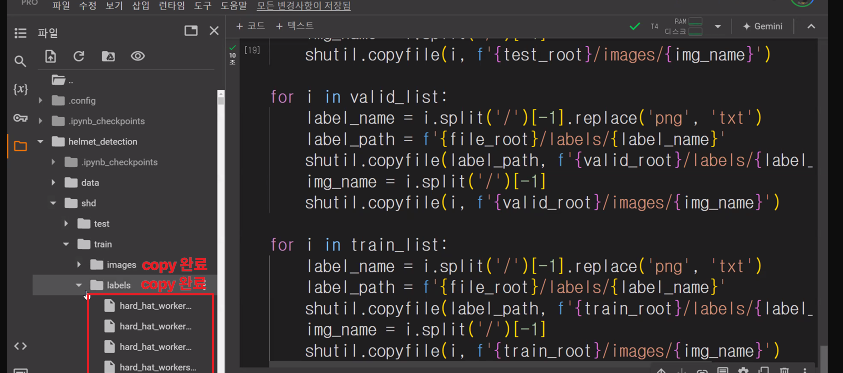
◼ 각 데이터셋 (테스트, 검증, 학습)의 파일을 적절한 디렉토리로 복사하기
: 이미지를 images 폴더로, 라벨 파일을 labels 폴더로 복사
|
for i in test_list:
label_name = i.split('/')[-1].replace('png', 'txt')
label_path = f'{file_root}/labels/{label_name}'
shutil.copyfile(label_path, f'{test_root}/labels/{label_name}')
img_name = i.split('/')[-1]
shutil.copyfile(i, f'{test_root}/images/{img_name}')
for i in valid_list:
label_name = i.split('/')[-1].replace('png', 'txt')
label_path = f'{file_root}/labels/{label_name}'
shutil.copyfile(label_path, f'{valid_root}/labels/{label_name}')
img_name = i.split('/')[-1]
shutil.copyfile(i, f'{valid_root}/images/{img_name}')
for i in train_list:
label_name = i.split('/')[-1].replace('png', 'txt')
label_path = f'{file_root}/labels/{label_name}'
shutil.copyfile(label_path, f'{train_root}/labels/{label_name}')
img_name = i.split('/')[-1]
shutil.copyfile(i, f'{train_root}/images/{img_name}')
|
 |
◼ 프로젝트 경로 설정
|
project_root = '/content/helmet_detection'
|
◼ 데이터셋 정보를 safety_helmet.yaml 파일에 저장하기
|
data = dict()
data['train'] = train_root
data['val'] = valid_root
data['test'] = test_root
data['nc'] = len(cls_list)
data['names'] = cls_list
with open(f'{project_root}/safety_helmet.yaml', 'w') as f:
yaml.dump(data, f)
|
 |
◼ 경로 이동
|
%cd /content/helmet_detection
|
| /content/helmet_detection |
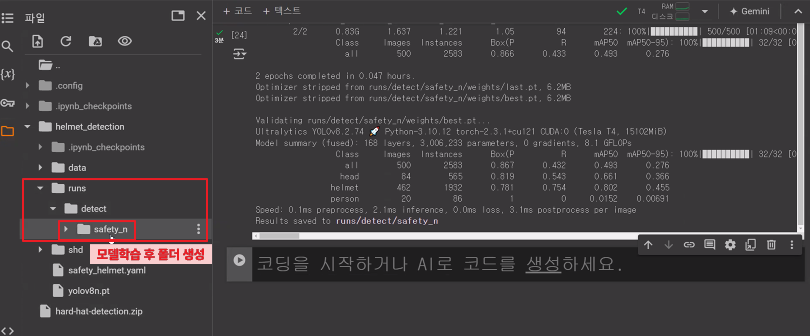
◼ 학습1 : yolov8n.pt | epochs 2번
|
model = YOLO('yolov8n.pt')
results = model.train(data='safety_helmet.yaml', epochs=2, batch=8, imgsz=224, device=0, workers=4, amp=False, patience=30, name='safety_n')
|
  |
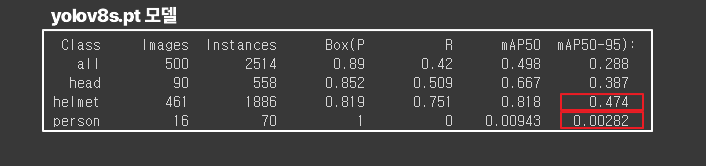
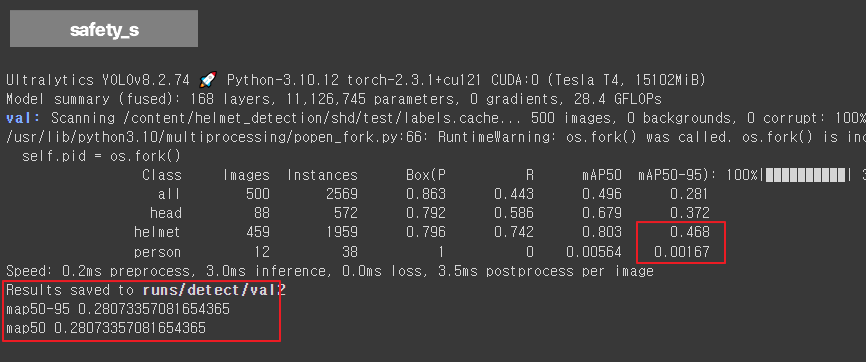
◼학습2 : yolov8s.pt | epochs 2번
|
model = YOLO('yolov8s.pt')
results = model.train(data='safety_helmet.yaml', epochs=2, batch=8, imgsz=224, device=0, workers=4, amp=False, patience=30, name='safety_s')
|
 |
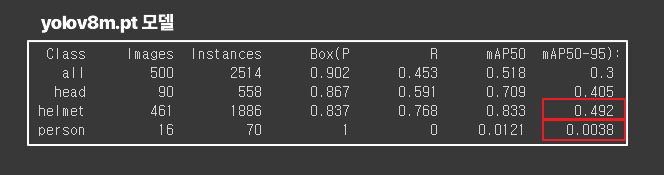
◼ 학습3 : yolov8m.pt | epochs 2번
|
model = YOLO('yolov8m.pt')
results = model.train(data='safety_helmet.yaml', epochs=2, batch=8, imgsz=224, device=0, workers=4, amp=False, patience=30, name='safety_m')
|
 |
◼ [ result_folder ] 는 모델 학습 결과와 관련된 모든 출력이 저장되는 디렉토리 정의
|
result_folder = f"{project_root}/runs/detect"
|
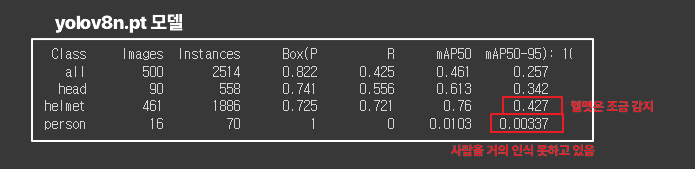
◼ 평가1 : yolov8n.pt | epochs 2번
|
model = YOLO(f'{result_folder}/safety_n/weights/best.pt')
metrics = model.val(split='test')
print('map50-95',metrics.box.map)
print('map50',metrics.box.map)
|
 |
◼평가2 : yolov8s.pt | epochs 2번
|
model = YOLO(f'{result_folder}/safety_s/weights/best.pt')
metrics = model.val(split='test')
print('map50-95',metrics.box.map)
print('map50',metrics.box.map)
|
 |
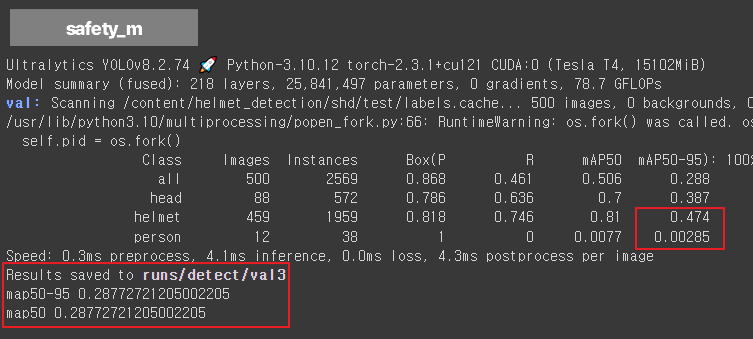
◼평가3 : yolov8m.pt | epochs 2번
|
model = YOLO(f'{result_folder}/safety_m/weights/best.pt')
metrics = model.val(split='test')
print('map50-95',metrics.box.map)
print('map50',metrics.box.map)
|
 |
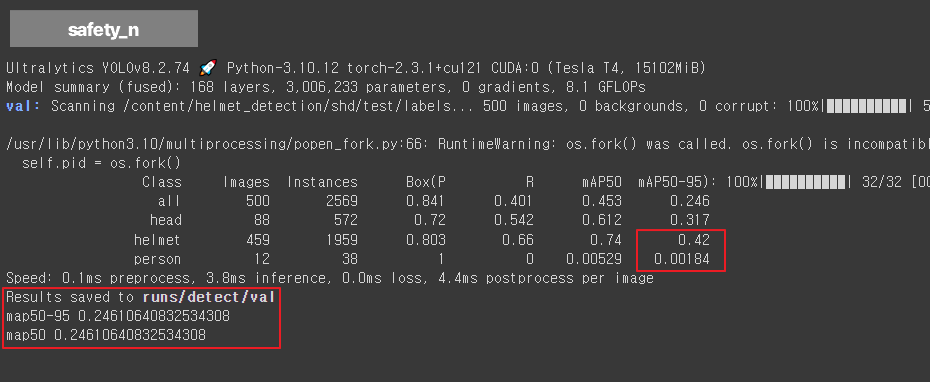
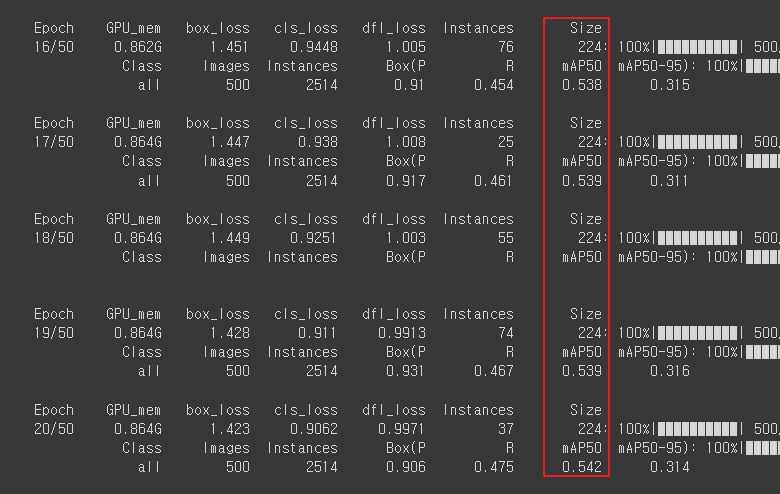
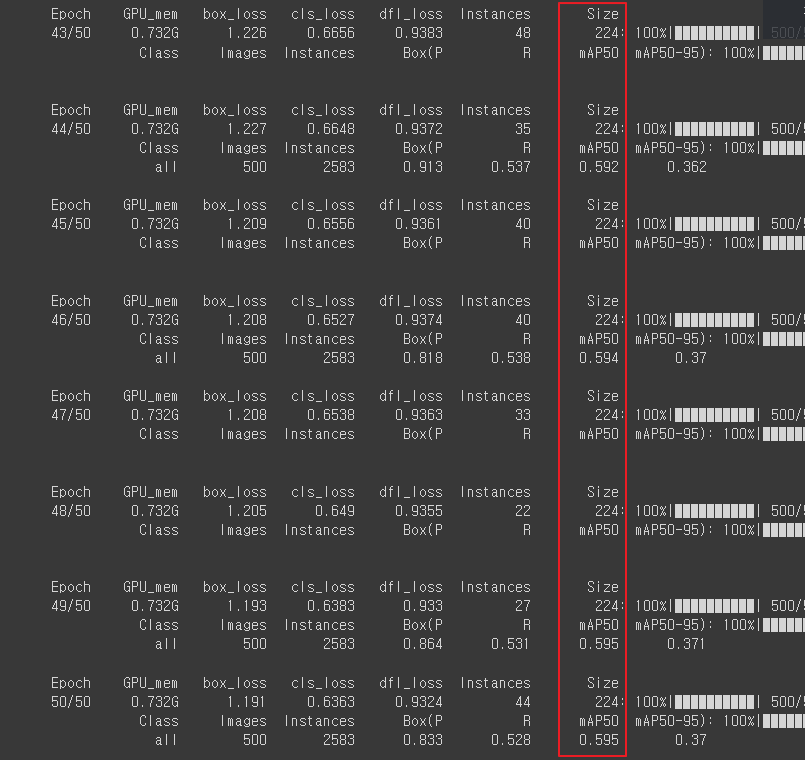
◼ 성능이 가장 괜찮았던 yolov8n.pt 로 epochs 50해서 학습진행
|
model = YOLO('yolov8n.pt')
results = model.train(data='safety_helmet.yaml', epochs=50, batch=8, imgsz=224, device=0, workers=4, amp=False, patience=30, name='safety')
|
  |
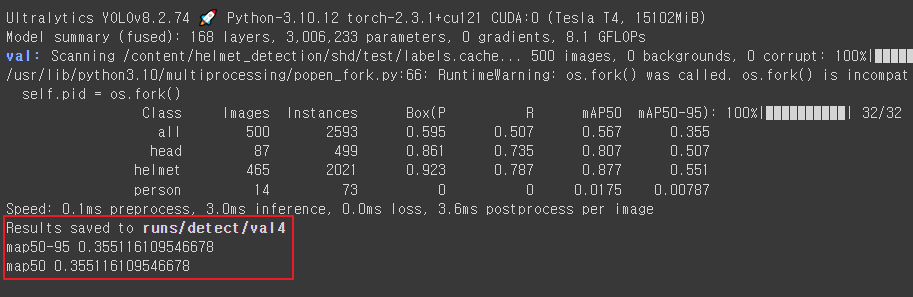
◼ 성능평가하기 : yolov8n.pt | epochs 50번
|
model = YOLO(f'{result_folder}/safety/weights/best.pt')
metrics = model.val(split='test')
print('map50-95',metrics.box.map)
print('map50',metrics.box.map)
|
 |
◼ 테스트 이미지 파일 목록을 무작위로 섞기
|
data_root = '/content/helmet_detection'
project_name = 'shd' # safty helmet_detection
test_root = f'{data_root}/{project_name}/test'
test_file_list = glob.glob(f'{test_root}/images/*')
random.shuffle(test_file_list)
|
◼ 이미지를 리사이즈하고 텐서로 변환하기
|
IMG_SIZE = (224, 224)
test_data_transform = transforms.Compose([
transforms.Resize(IMG_SIZE),
transforms.ToTensor()
])
|
◼ 데이터셋의 클래스 라벨 확인
|
model.names |
| {0: 'head', 1: 'helmet', 2: 'person'} |
◼ 모델의 클래스 수에 맞춰 랜덤한 색상을 생성
|
color_dict = {i: tuple([random.randint(0, 255) for _ in range(3)]) for i in range(len(model.names))}
color_dict
|
| [[153, 7, 229], [169, 82, 76], [235, 190, 195]] |
◼ 이미지를 읽고, RGB로 변환한 다음, YOLO 모델을 통해 객체 감지
|
test_img = cv2.imread(test_file_list[0])
img_src = cv2.cvtColor(test_img, cv2.COLOR_BGR2RGB)
result = model(img_src)
|
| 0: 224x224 1 helmet, 10.7ms Speed: 1.2ms preprocess, 10.7ms inference, 2.5ms postprocess per image at shape (1, 3, 224, 224) |
◼ result는 모델의 예측 결과, 첫번째 이미지 정보
|
result[0].boxes
|
| ultralytics.engine.results.Boxes object with attributes: cls: tensor([1.], device='cuda:0') conf: tensor([0.7466], device='cuda:0') data: tensor([[246.0621, 118.1428, 274.1810, 157.5771, 0.7466, 1.0000]], device='cuda:0') id: None is_track: False orig_shape: (416, 416) shape: torch.Size([1, 6]) xywh: tensor([[260.1216, 137.8600, 28.1189, 39.4343]], device='cuda:0') xywhn: tensor([[0.6253, 0.3314, 0.0676, 0.0948]], device='cuda:0') xyxy: tensor([[246.0621, 118.1428, 274.1810, 157.5771]], device='cuda:0') xyxyn: tensor([[0.5915, 0.2840, 0.6591, 0.3788]], device='cuda:0') |
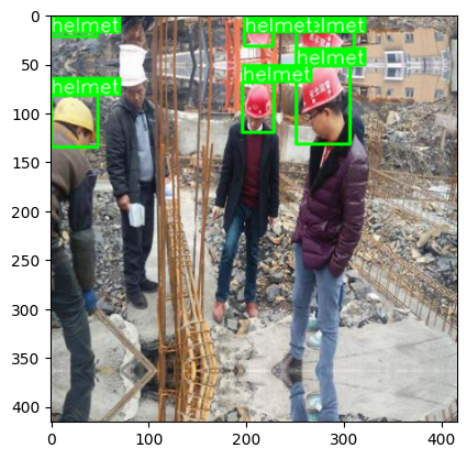
◼ 첫번째 예측이미지 시각화
|
plt.imshow(img_src)
plt.show()
|
 |
◼ 객체 감지 결과를 시각화할 때 사용할 색상 정보 딕셔너리 설정
|
color_dict = {
0: (255, 0, 0),
1: (0, 255, 0),
2: (0, 0, 255)
}
|
◼ YOLO 모델을 사용하여 이미지에서 객체를 감지, 결과를 시각화
|
num_head = 0
test_img = cv2.imread(test_file_list[1])
img_src = cv2.cvtColor(test_img, cv2.COLOR_BGR2RGB)
result = model(img_src)[0]
annotator = Annotator(img_src)
boxes = result.boxes
for box in boxes:
b = box.xyxy[0]
cls = box.cls
if 'head' == model.names[int(cls)]:
num_head += 1
annotator.box_label(b, model.names[int(cls)], color_dict[int(cls)])
img_src = annotator.result ()
if num_head > 0:
cv2.rectangle(img_src, (0, 0), (300, 50), (255, 0, 0), -1, cv2.LINE_AA)
cv2.putText(img_src, 'No Helmet!', (5, 30), cv2.FONT_HERSHEY_DUPLEX, 1, (255, 255, 255), thinkness=3, lineType=cv2.LINE_AA)
plt.imshow(img_src)
plt.show()
|
 |
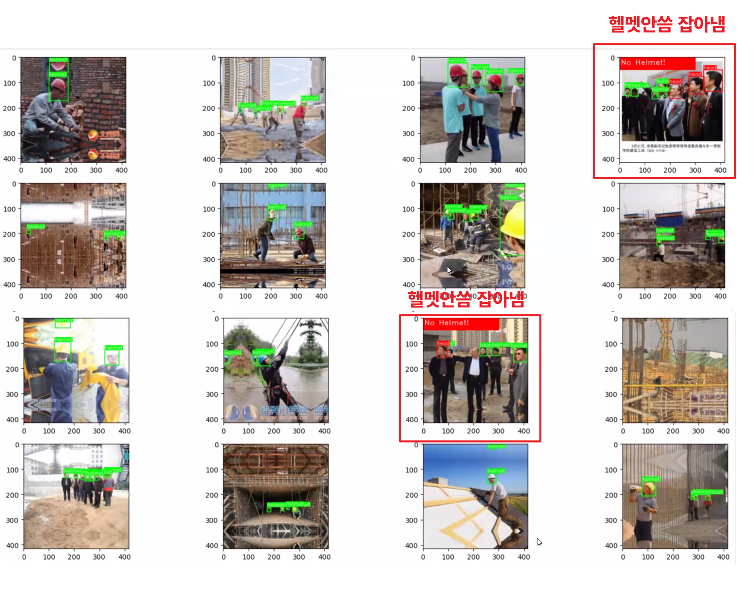
◼ 에측결과 여러개 시각화
|
plt.figure(figsize=(20, 16))
for i in range(20):
num_head = 0
test_img = cv2.imread(test_file_list[idx])
img_src = cv2.cvtColor(test_img, cv2.COLOR_BGR2RGB)
result = model(img_src)[0]
annotator = Annotator(img_src)
boxes = result.boxes
for box in boxes:
b = box.xyxy[0]
cls = box.cls
if 'head' == model.names[int(cls)]:
num_head += 1
annotator.box_label(b, model.names[int(cls)], color_dict[int(cls)])
img_src = annotator.result ()
plt.subplot(5, 4, (idx+1))
if num_head > 0:
cv2.rectangle(img_src, (0, 0), (300, 50), (255, 0, 0), -1, cv2.LINE_AA)
cv2.putText(img_src, 'No Helmet!', (5, 30), cv2.FONT_HERSHEY_DUPLEX, 1, (255, 255, 255), thinkness=3, lineType=cv2.LINE_AA)
plt.imshow(img_src)
plt.show()
|
 |
@. 과제1 : 실내(편의점, 매장) 사람 이상행동 잡아내기
데이터셋: https://www.aihub.or.kr/aihubdata/data/view.do?currMenu=115&topMenu=100&aihubDataSe=data&dataSetSn=71550
@. 과제2 : 깃허브 꾸미기 (20일까지)
1: https://github.com/dev-aram
2: https://github.com/Aribabo
3: https://github.com/junyealim
과제정리/ 논문리뷰/ 예제 (옵션) / 1차,2차 프로젝트
'AI > 컴퓨터 비전' 카테고리의 다른 글
| 18. YOLO v8을 이용한 차량 파손 검사 (0) | 2024.08.13 |
|---|---|
| 17. YOLO v8을 이용한 이상행동 탐지 (0) | 2024.08.12 |
| 15. YOLO v8을 이용한 폐질환 분류 (0) | 2024.08.07 |
| 14. YOLO | 객체탐지 (0) | 2024.08.06 |
| @. 과제 (0) | 2024.08.05 |


